I’ve finally managed to get glitch_infinite( ) and glitch1( ) to work using Vcc glitch on the V4 software.
But the glitch parameters I’ve got don’t really have a high success percentage, probably 7% at best.
I also noticed that the glitch parameters for glitch_infinite( ) and glitch1( ) were different. I’m guessing that this difference could be due to their instructions?
I have the same result. I’m think the same what this is result of differents in instructions.
In my experience the best results can give short length of cable. Now I use 10 cm coax and I have 70-80%. When I using 60 cm caox the probably is near 20%. But another length of cable needed another glitch width and offset.
Good to hear you finally got some glitches! I’d suspect you’re probably right regarding the instruction differences. Out of curiosity, how much did the parameters change by?
If either of you want to try some additional glitching, Fault_4 seems to work pretty well with voltage glitching (and I’d imagine Fault_5 would as well).
I also hooked an oscilloscope onto the CW308 to find out the difference between the outputs of V4 and V5 software. They look very much alike. Speaking of which, for Vcc glitching, both V4 and V5 software allow the glitch widths to be set with negative values. Does a negative glitch width make any sense? Likewise, for clock glitching, does a negative glitch width make any sense? If so, how would they look like on a plot/scope?
All a negative width means is that phase shift two creates the rising edge of the signal instead of the falling edge and phase shift 1 creates the falling edge instead of the rising edge.
If I understand you correctly, does that mean that for a given negative glitch width, there is always positive complement of it, i.e. glitch width = -10 = 40? If so, then that would reduce the search space by quite a fair bit =)
Do you know why do our glitch parameters differ even though we (me, Nik, and yourself) are all performing Vcc glitching on the same STM32F3 target boards running the same tutorial examples?
Is there any place where I could find more information on this?
The most part of differ, it is length of cable, mosfet transistor (in different versions of CW it different) and the tool have rather parameters too (I use CW1200 Pro).
I think that the width of impulse in seconds near of 1.7 Voltage on PCB STM32F3 must be constant for all. It can mesuared by oscilloscope.
The phase offset include all different listed above and must be different. It is just only My things.
I also failed XMEGA glitch and am trying to glitch with STM32.
There is one question. Please let me know if you know anything.
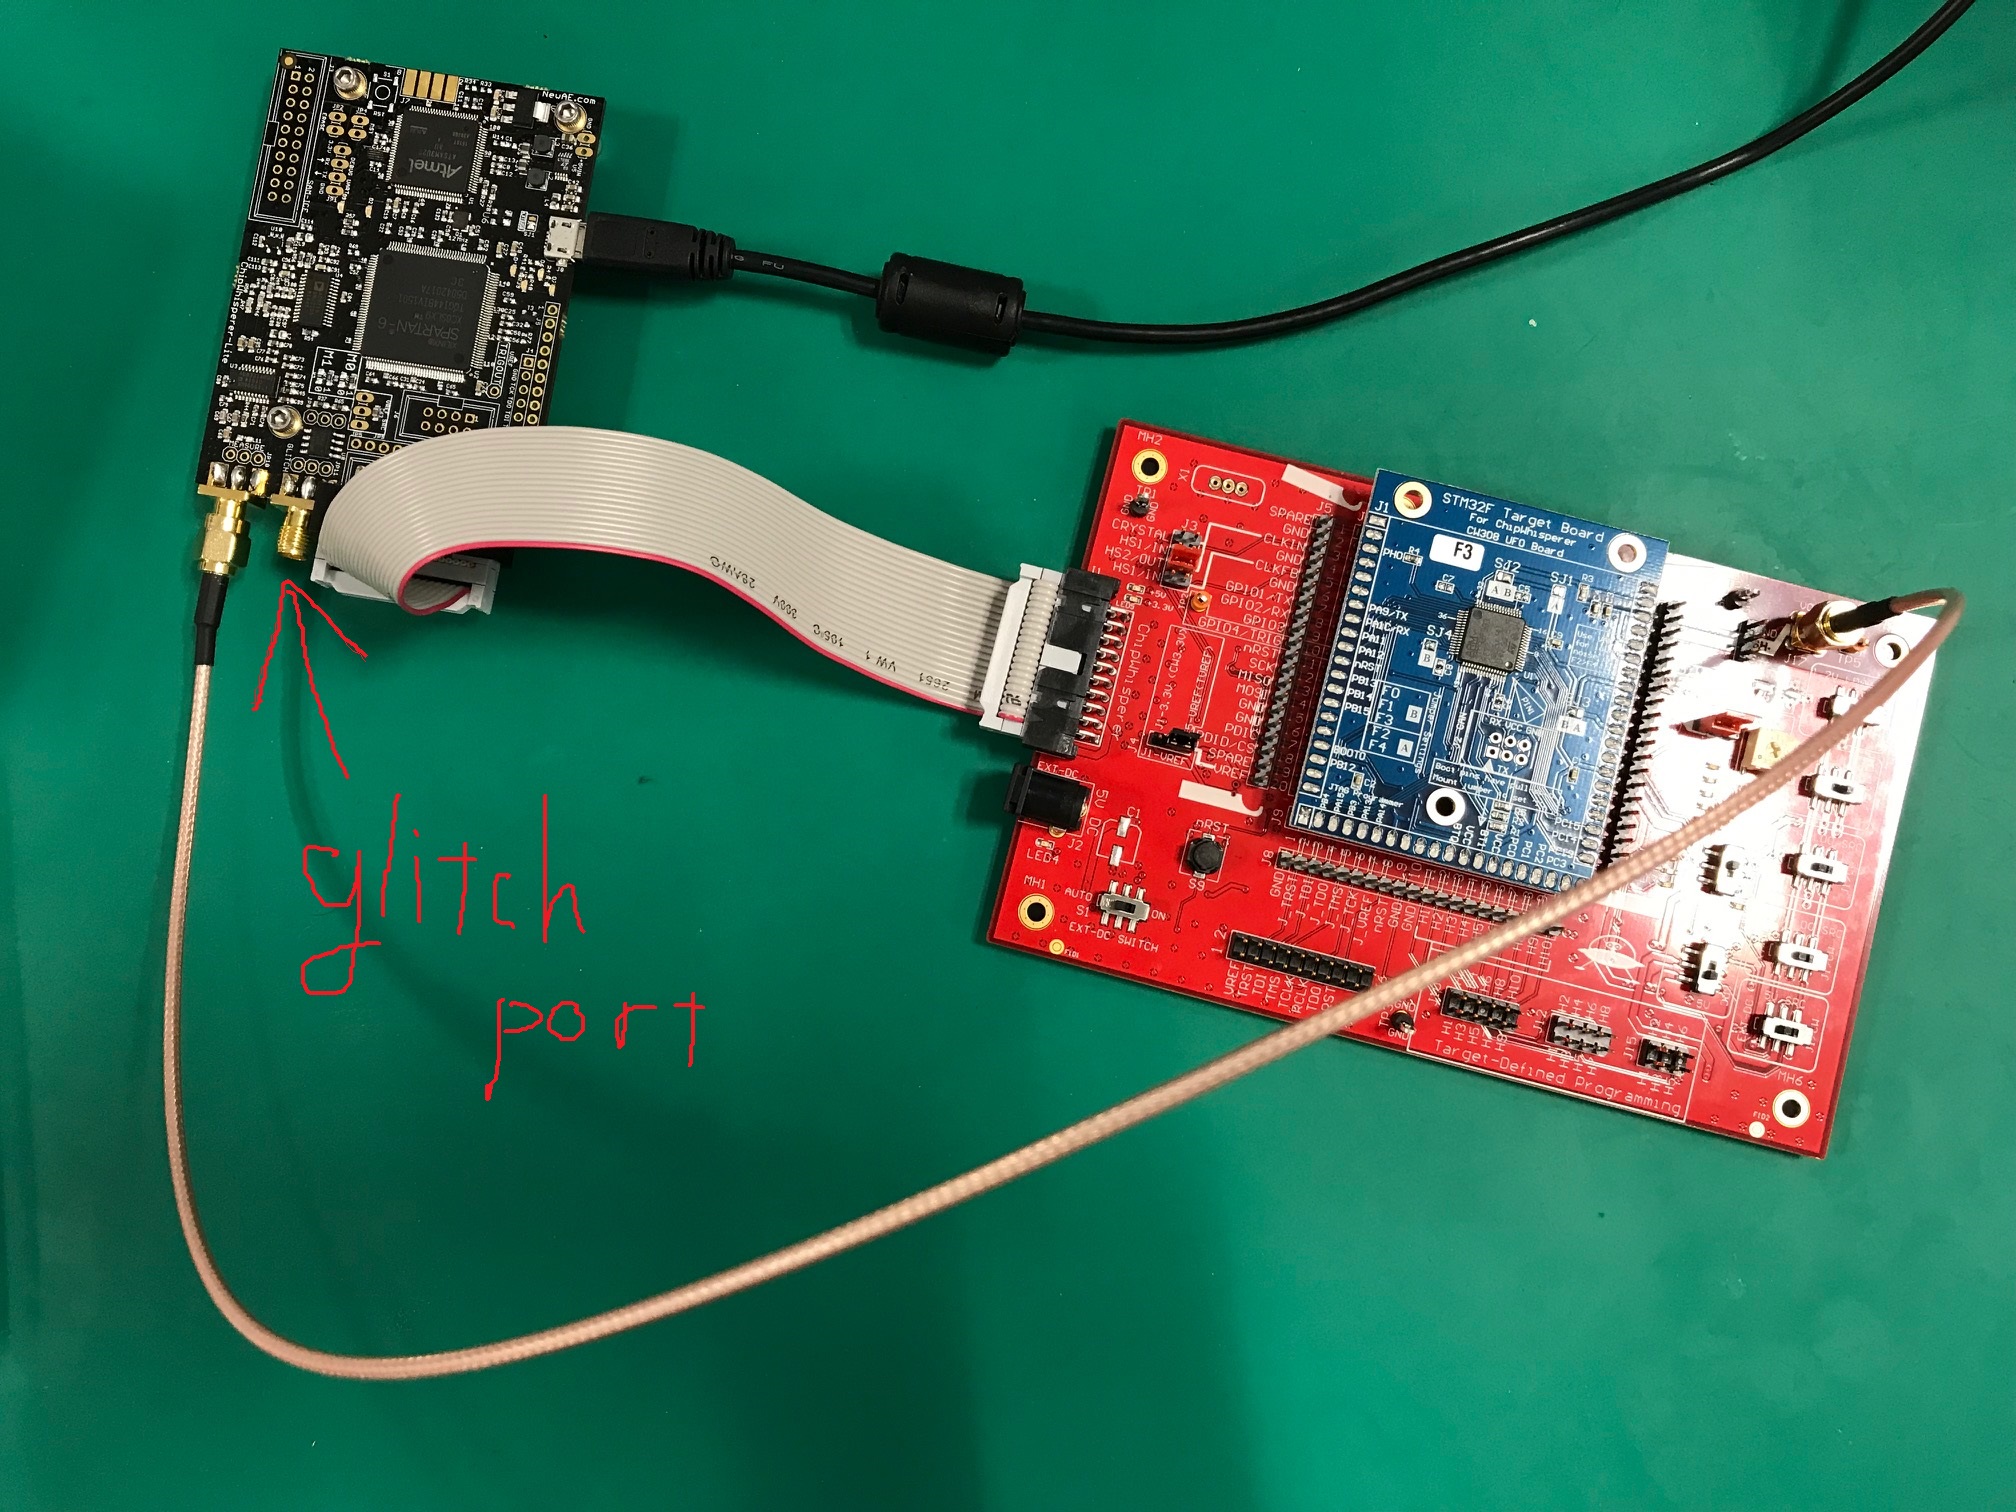
Q:Where should I connect the glitch port of CW1173 ChipWhisperer-Lite on CW308 UFO Target ?
I think it is necessary to connect the glitch port for glitch.
According to your photo, you should only connect the coax cable to the glitch port of the CW1173 as there is only one SMA connector on the CW308, which serves as both the glitch input and capture output.
You do not need to connect the coax cable to the capture port for Vcc glitch to work.
In order to perform both glitching and capture, you will need a SMA TEE adapter/connector to be connected on the CW308.
Sorry about the slow response. I’d concur with Nik in that those all have a lot to do with variability in the glitch settings between different boards. Unfortunately, there’s a lot of complicated stuff going on in the chip when we do glitching and we don’t really know the underlying circuit, so we can’t really say for certain, just make educated guesses.
I believe the only way to get above a 50% pulse width is to go the full 100% with enable_only. Time based glitch settings do exist in the form of glitch_fine and offset_fine, though their max range is rougly +/-5ns. I’m not sure how possible/easy it would be to increase this range.
When I try to write a program to STM32F3, I get the following error:
Do you know how to solve?
An error has occurred:
Could not detect STM32F, check connections, BOOT MODE entry setup
It is usually safe to continue, but save your work just in case.
If it persists, try reseting the settings first before creating a new ticket informing the details bellow.
Traceback (most recent call last):
File “/home/cwuser/Desktop/chipwhisperer/software/chipwhisperer/capture/ui/programmers_dialog.py”, line 353, in readSignature
self.stm32f.open_and_find(log_func=self.statusLine.appendPlainText)
File “/home/cwuser/Desktop/chipwhisperer/software/chipwhisperer/capture/api/programmers.py”, line 66, in func_wrapper
val = func(self, *args, **kwargs)
File “/home/cwuser/Desktop/chipwhisperer/software/chipwhisperer/capture/api/programmers.py”, line 259, in open_and_find
sig, chip = stm32f.find(logfunc=log_func)
File “/home/cwuser/Desktop/chipwhisperer/software/chipwhisperer/hardware/naeusb/programmer_stm32fserial.py”, line 150, in find
self.initChip()
File “/home/cwuser/Desktop/chipwhisperer/software/chipwhisperer/hardware/naeusb/programmer_stm32fserial.py”, line 317, in initChip
raise IOError(“Could not detect STM32F, check connections, BOOT MODE entry setup”)
IOError: Could not detect STM32F, check connections, BOOT MODE entry setup
Failed to detect chip. Check following:
1.Connections and device power.
2.Device has valid clock (or remove clock entirely for internal osc).
3.On Rev-02 CW308T-STM32Fx boards, BOOT0 is routed to PDIC.
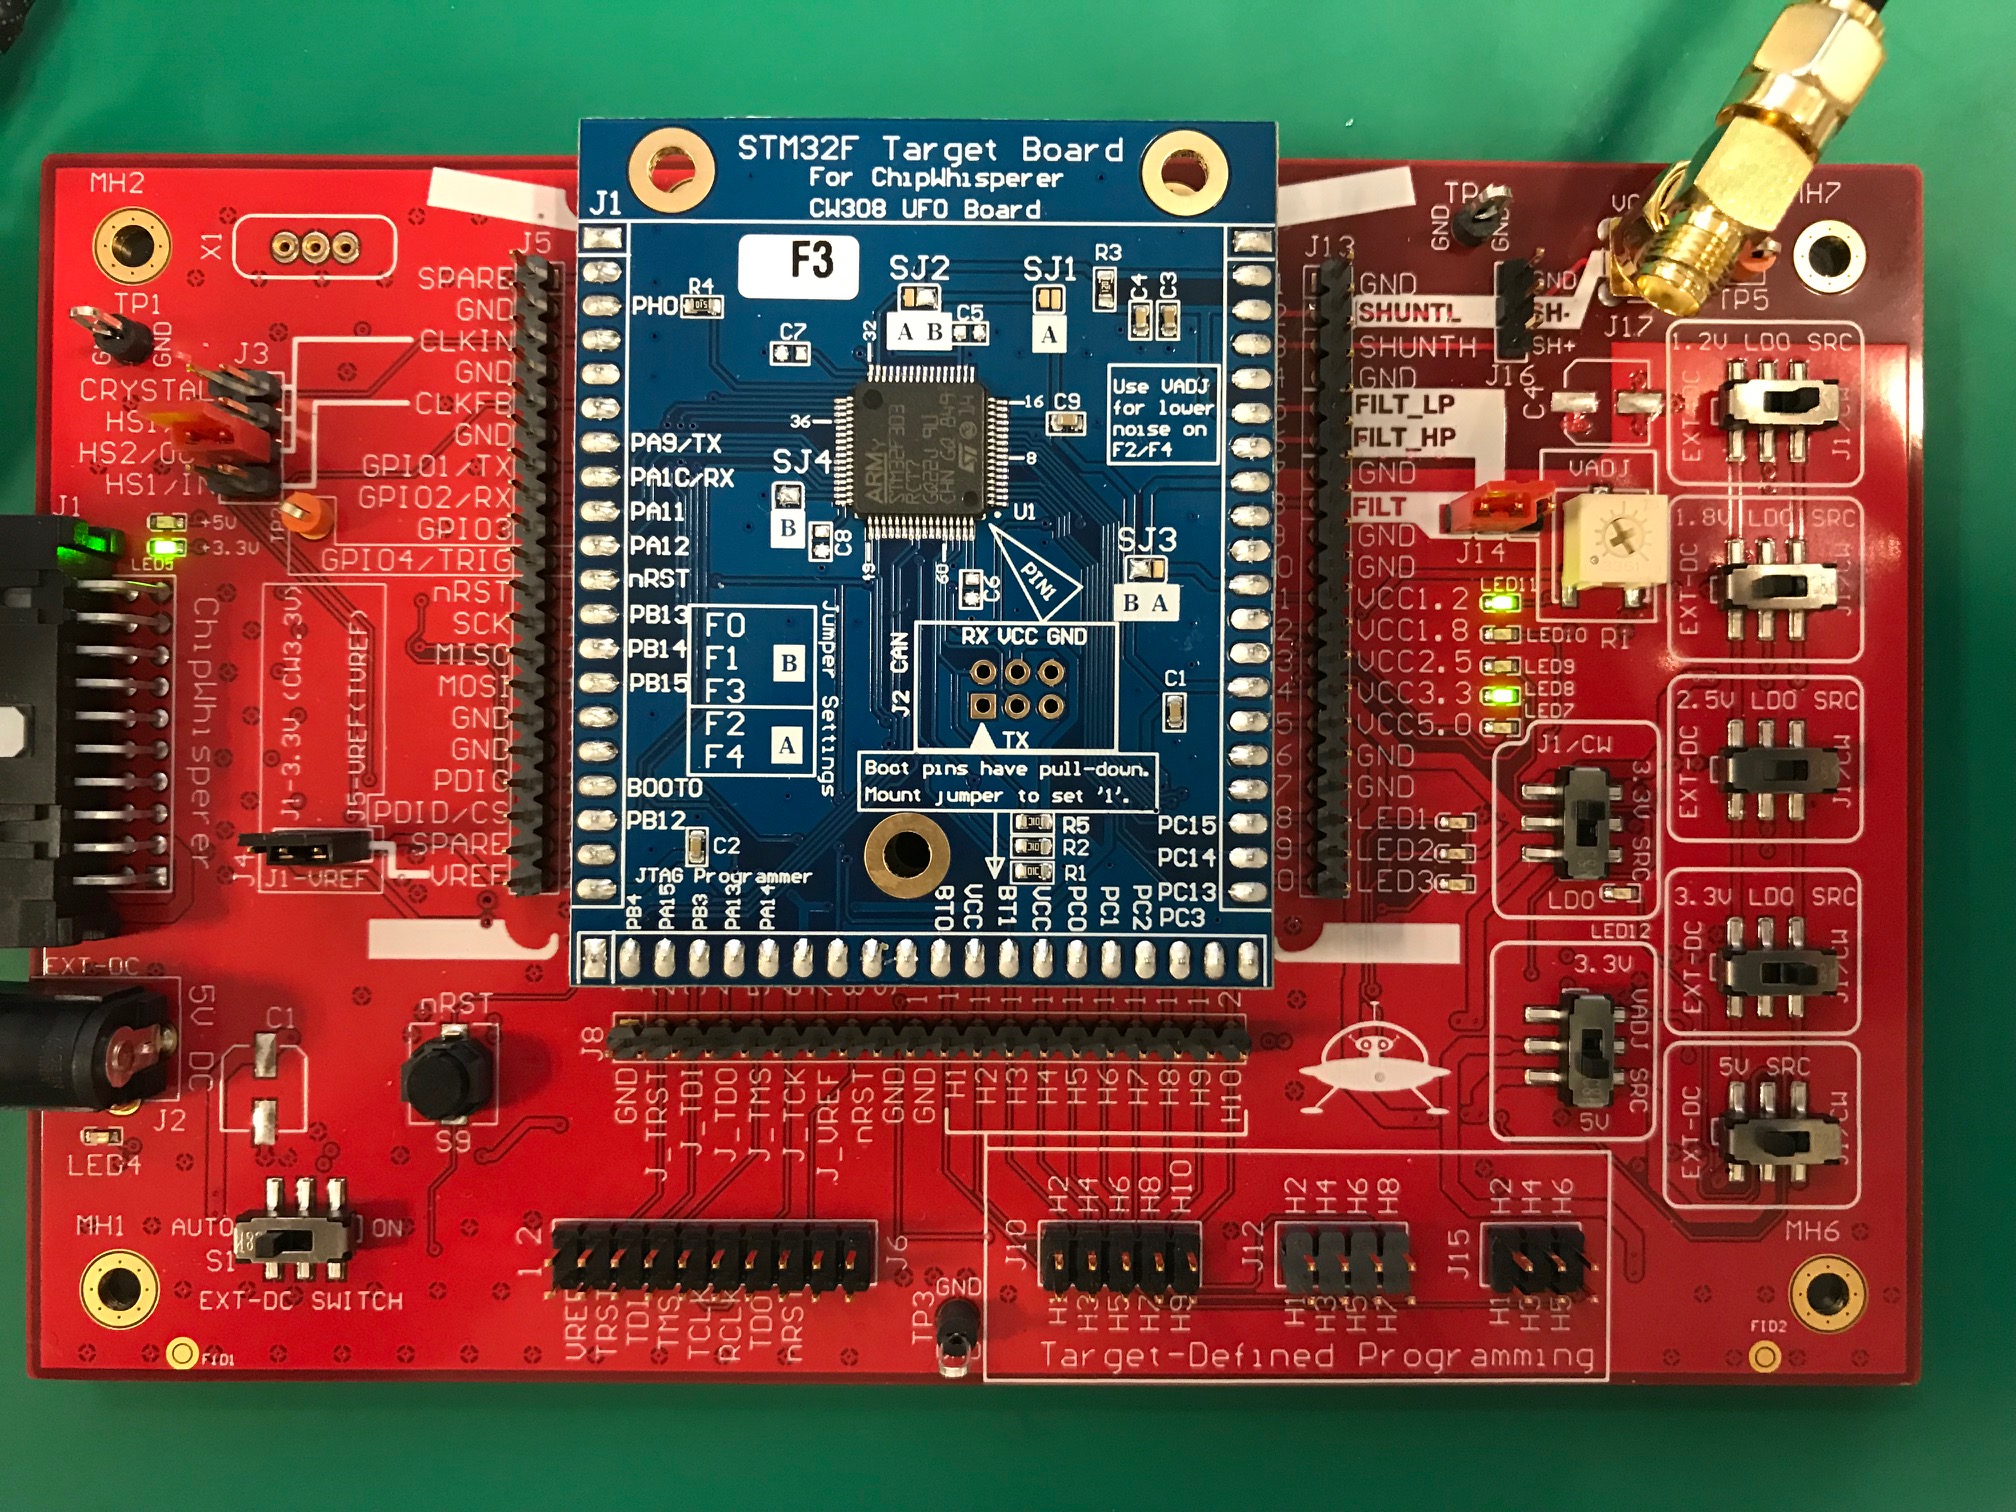
And I want to know if the setup of CW308 is the correct below.
Hi, the possible reasons for this are the ones you highlighted in bold, did you check them?
From your picture I can see that device power is ok. However it’s possible that it’s not receiving a clock. Can you verify your clock settings in SW? If you’re running one of our Jupyter notebook tutorials, make sure it’s unchanged. If you’re running CW4 with the GUI, then under the “scope settings” tab, check that Target HS IO-Out is set to CLKGEN, and in “CLKGEN Settings” check that “Current Frequency” is 7.38MHz and that “DCM Locked” is checked.
Also verify that CLKIN on J5 has a 7.38 MHz clock.
Finally, what rev UFO board do you have? Look for “P/N NAE-CW308-0x” at the back of the board, above the cutout. If you have a rev-02 board, follow the additional instructions here.
Sorry about the slow response. I checked your advices.
I use 「VMWARE_ChipWhisperer.Lubuntu.64-bit_4.0.1」, so I checked the settings with the GUI.
I checked that Target HS IO-Out is set to CLKGEN, and in “CLKGEN Settings” check that “Current Frequency” is 7.38MHz and “DCM Locked” is checked.
I checked that CLKIN on J5 had a 7.38 MHz clock by oscilloscope.
My boards are 「“P/N NAE-CW308-04」 and 「STM32F3」.
So I think the following steps are not necessary. https://wiki.newae.com/CW308T-STM32F#Rev_-02_Boards
I am interested in 「 2.Device has valid clock (or remove clock entirely for internal osc).」.
Do you know how to remove clock entirely for internal osc?