Yup - should work fully! It needs more tuning on the window most likely - I’m going to work on updating that lab to explain how to do that (rather than just throw some “good numbers” in magically).
So will take a bit longer, but you can see with that change even how it made a much bigger difference!
We are trying to determine how to connect our board to CW. I don’t see any information on the 2-part board. Could you please direct me at any documentation on how we can do this?
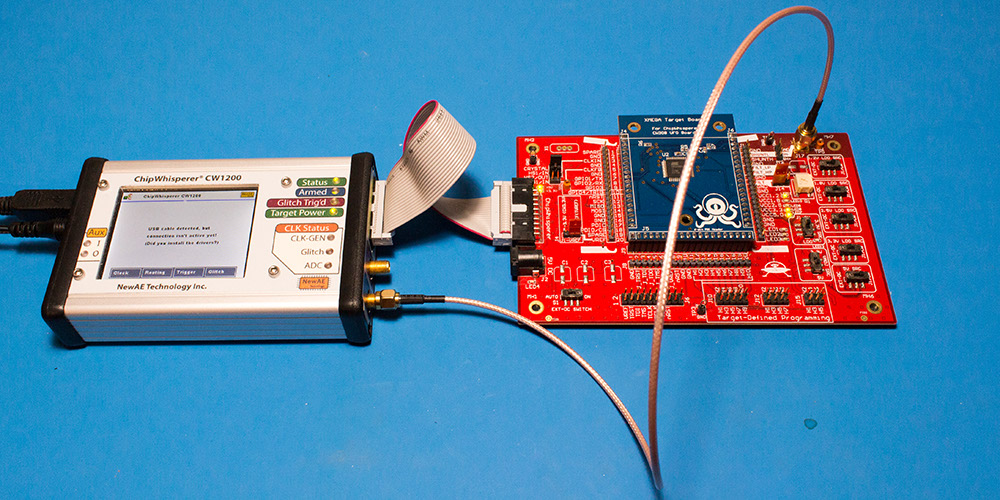
Which board are you trying to connect to the ChipWhisperer? The pinout can be found here if you’re trying to connect to an external board. The CW308 has another 20pin connector on it that you can connect to the Lite via a 20pin cable if you’re using that. See the following picture for an example (replace the CWPro with the Lite):
Thanks for your help. We are trying to connect one of our parts to the CW-Lite 2-part board. What is the other connector? And, are there any instructions or specifications on how we can build our board for our chip?
In that case, this pinout tells you what each of the pins on the 20 pin connector does (power out, ground, communication lines, etc). You’ll also need an SMA connector on the other board for voltage measurement and/or glitching. The board will require the following:
20 pin connector following the pinout linked earlier
Shunt resistor between V+ (3.3V from CW or regulator output) and Vcc of microcontroller
SMA connector connected to low side of shunt resistor
Capacitors only on high side of shunt resistor
A shared clock between the ChipWhisperer and the target. The ChipWhisperer can either output a clock or take one as an input.
All IO voltages need to be 3.3V
Of course, you also have the option of making a CW308 compatible board with a shunt resistor. See: https://wiki.newae.com/CW308T-STM32F for an example of a CW308 compatible board.
@coflynn Feel free to chime in if I’m forgetting anything.
I just tried it and it fails in the same way - it misses a couple of bytes. I know previously the code updated automatically for us. How can I make sure I am running the latest? The modified date says 5 hours.
The latest version of the tutorial has a section entitled " The Ghost Peak Problem". As for getting the latest version, it usually involves running a git pull inside of chipwhisperer/.
If you have this section and are still unable to break the last few bytes, do you think you can recapture inside of a ChipWhisperer project (similar to something like CPA_1) and send it over to me?
Thanks Alex. There is no “The Ghost Peak Problem” section. I tried using git in CW, but I don’t know how to do that. Do you have any instructions on how to do this?
To update ChipWhisperer on VirutalBox, you’ll need to first login to the virtual machine (should be vagrant for both username and password). Once you’re logged in, input the following commands:
cd work/projects/chipwhisperer git pull
If the git pull doesn’t work, you may need to run:
cd jupyter git stash cd .. git pull
which will stash any changes you made to the notebook (including running through them).
Thanks 31415 and Alex. I successfully executed the git commands. I also ran the second set of commands and it said that it was up to date. However, now when I try to open any script, I get the following error, “Unreadable Notebook: /home/vagrant/work/projects/chipwhisperer/jupyter/PA_DPA_3-AES_DPA_Attack.ipynb NotJSONError(“Notebook does not appear to be JSON: ‘’…”,)”.
I would try and use the file 31415 linked to, but it seems that something is wrong with my setup now.
I don’t know how to resolve this. Any help is appreciated.
It’s a mystery to me why you can’t run the notebook, it works for me. My best guess is that you somehow have got an HTML-ized version of the notebook, as here: https://github.com/jupyter/help/issues/67