##### CW5 JUPYTER NOTEBOOK EXPLORED AS PYTHON FILE
#!/usr/bin/env python
# coding: utf-8
# # Breaking Hardware AES on CW305 FPGA
# This tutorial is a continuation from [Tutorial CW305-1 Building a Project](http://wiki.newae.com/Tutorial_CW305-1_Building_a_Project). Here, we'll use our hardware setup to find a fixed secret key that the Artix FPGA is using for AES encryption. This tutorial relies on previous knowledge from [Using_CW-Analyzer_for_CPA_Attack](PA_CPA_1-Using_CW-Analyzer_for_CPA_Attack.ipynb), so make sure you understand how that attack works.
# In[1]:
#Parameters - None needed!
# ## Background Theory
# During this tutorial, we'll be working with a hardware AES implementation. This type of attack can be much more difficult than a software AES attack. In the software AES attacks, we needed hundreds or thousands of clock cycles to capture the algorithm's full execution. In contrast, a hardware AES implementation may have a variety of speeds. Depending on the performance of the hardware, a whole spectrum of execution speeds can be achieved by executing many operations in a single clock cycle. It is theoretically possible to execute the entire AES encryption in a single cycle, given enough hardware space and provided that the clock is not too fast. Most hardware accelerators are designed to complete one round or one large part of a round in a single cycle.
#
# This fast execution may cause problems with a regular CPA attack. In software, we found that it was easy to search for the outputs of the s-boxes because these values would need to be loaded from memory onto a high-capacitance data bus. This is not necessarily true on an FPGA, where the output of the s-boxes may be directly fed into the next stage of the algorithm. In general, we may need some more knowledge of the hardware implementation to successfully complete an attack.
#
# In our case, let's suppose that every round of AES is completed in a single clock cycle. Recall the execution of AES:
#
# <img src="img/AES_Encryption.png" width="250">
#
# Here, every blue block is executed in one clock cycle. This means that an excellent candidate for a CPA attack is the difference between the input and output of the final round. It is likely that this state is stored in a port that is updated every round, so we expect that the Hamming distance between the round input and output is the most important factor on the power consumption. Also, the last round is the easiest to attack because it has no MixColumns operation. We'll use this Hamming distance as the target in our CPA attack.
# ## Capture Notes
#
# Most of the capture settings used below are similar to the standard ChipWhisperer scope settings. However, there are a couple of interesting points:
#
# - We're only capturing 129 samples (the minimum allowed), and the encryption is completed in less than 60 samples with an x4 ADC clock. This makes sense - as we mentioned above, our AES implementation is computing each round in a single clock cycle.
# - We're using EXTCLK x4 for our ADC clock. This means that the FPGA is outputting a clock signal, and we aren't driving it.
#
# Other than these, the last interesting setting is the number of traces. By default, the capture software is ready to capture 5000 traces - many more than were required for software AES! It is difficult for us to measure the small power spikes from the Hamming distance on the last round: these signals are dwarfed by noise and the other operations on the chip. To deal with this small signal level, we need to capture many more traces.
# ## Capture Setup
# Setup is somewhat similar to other targets. This time, however, we'll be using an external clock (from the FPGA). We'll also do the rest of the setup manually:
# In[2]:
import chipwhisperer as cw
scope = cw.scope()
scope.gain.db = 25
scope.adc.samples = 129
scope.adc.offset = 0
scope.adc.basic_mode = "rising_edge"
scope.clock.clkgen_freq = 7370000
scope.clock.adc_src = "extclk_x4"
scope.trigger.triggers = "tio4"
scope.io.tio1 = "serial_rx"
scope.io.tio2 = "serial_tx"
scope.io.hs2 = "disabled"
# Next we'll connect to the CW305 board. Here we'll need to specify our bitstream file to load as well as the usual scope and target_type arguments.
#
# Pick the correct bitfile for your CW305 board. By setting `force=False`, the bitfile will only be programmed if the FPGA is uninitialized (e.g. after powering up). Change to `force=True` to always program the FPGA (e.g. if you have generated a new bitfile).
# In[3]:
bitstream = r"../../../hardware/victims/cw305_artixtarget/fpga/vivado_examples/aes128_verilog/aes128_verilog.runs/impl_100t/cw305_top.bit"
#bitstream = r"../hardware/victims/cw305_artixtarget/fpga/vivado_examples/aes128_verilog/aes128_verilog.runs/impl_35t/cw305_top.bit"
target = cw.target(scope, cw.targets.CW305, bsfile=bitstream, force=True)
# In[4]:
project_file = "projects/Tutorial_HW_CW305.cwp"
project = cw.create_project(project_file, overwrite=True)
# Next we set all the PLLs. We enable CW305's PLL1; this clock will feed both the target and the CW ADC. As explained [here](http://wiki.newae.com/Tutorial_CW305-1_Building_a_Project#Capture_Setup), **make sure the DIP switches on the CW305 board are set as follows**:
# - J16 = 0
# - K16 = 1
# In[5]:
target.vccint_set(1.0)
# we only need PLL1:
target.pll.pll_enable_set(True)
target.pll.pll_outenable_set(False, 0)
target.pll.pll_outenable_set(True, 1)
target.pll.pll_outenable_set(False, 2)
# run at 10 MHz:
target.pll.pll_outfreq_set(10E6, 1)
# 1ms is plenty of idling time
target.clkusbautooff = True
target.clksleeptime = 1
# In[7]:
# ensure ADC is locked:
scope.clock.reset_adc()
assert (scope.clock.adc_locked), "ADC failed to lock"
# Occasionally the ADC will fail to lock on the first try; when that happens, the above assertion will fail (and on the CW-Lite, the red LED will be on). Simply re-running the above cell again should fix things.
# ## Trace Capture
# Below is the capture loop. The main body of the loop loads some new plaintext, arms the scope, sends the key and plaintext, then finally records and appends our new trace to the `traces[]` list.
#
# Because we're capturing 5000 traces, this takes a bit longer than the attacks against software AES implementations.
#
# Note that the encryption result is read from the target and compared to the expected results, as a sanity check.
# In[8]:
from tqdm import tnrange
import numpy as np
import time
from Crypto.Cipher import AES
ktp = cw.ktp.Basic()
traces = []
textin = []
keys = []
N = 5000 # Number of traces
# initialize cipher to verify DUT result:
key, text = ktp.next()
cipher = AES.new(bytes(key), AES.MODE_ECB)
for i in tnrange(N, desc='Capturing traces'):
# run aux stuff that should come before trace here
key, text = ktp.next() # manual creation of a key, text pair can be substituted here
textin.append(text)
keys.append(key)
ret = cw.capture_trace(scope, target, text, key)
if not ret:
print("Failed capture")
continue
assert (list(ret.textout) == list(cipher.encrypt(bytes(text)))), "Incorrect encryption result!\nGot {}\nExp {}\n".format(ret.textout, list(text))
#trace += scope.getLastTrace()
traces.append(ret.wave)
project.traces.append(ret)
# This shows how a captured trace can be plotted:
# In[9]:
from bokeh.plotting import figure, show
from bokeh.io import output_notebook
output_notebook()
p = figure(plot_width=800)
xrange = range(len(traces[0]))
p.line(xrange, traces[0], line_color="red")
show(p)
# Finally we save our traces and disconnect. By saving the traces, the attack can be repeated in the future without having to repeat the trace acquisition steps above.
# In[10]:
project.save()
scope.dis()
target.dis()
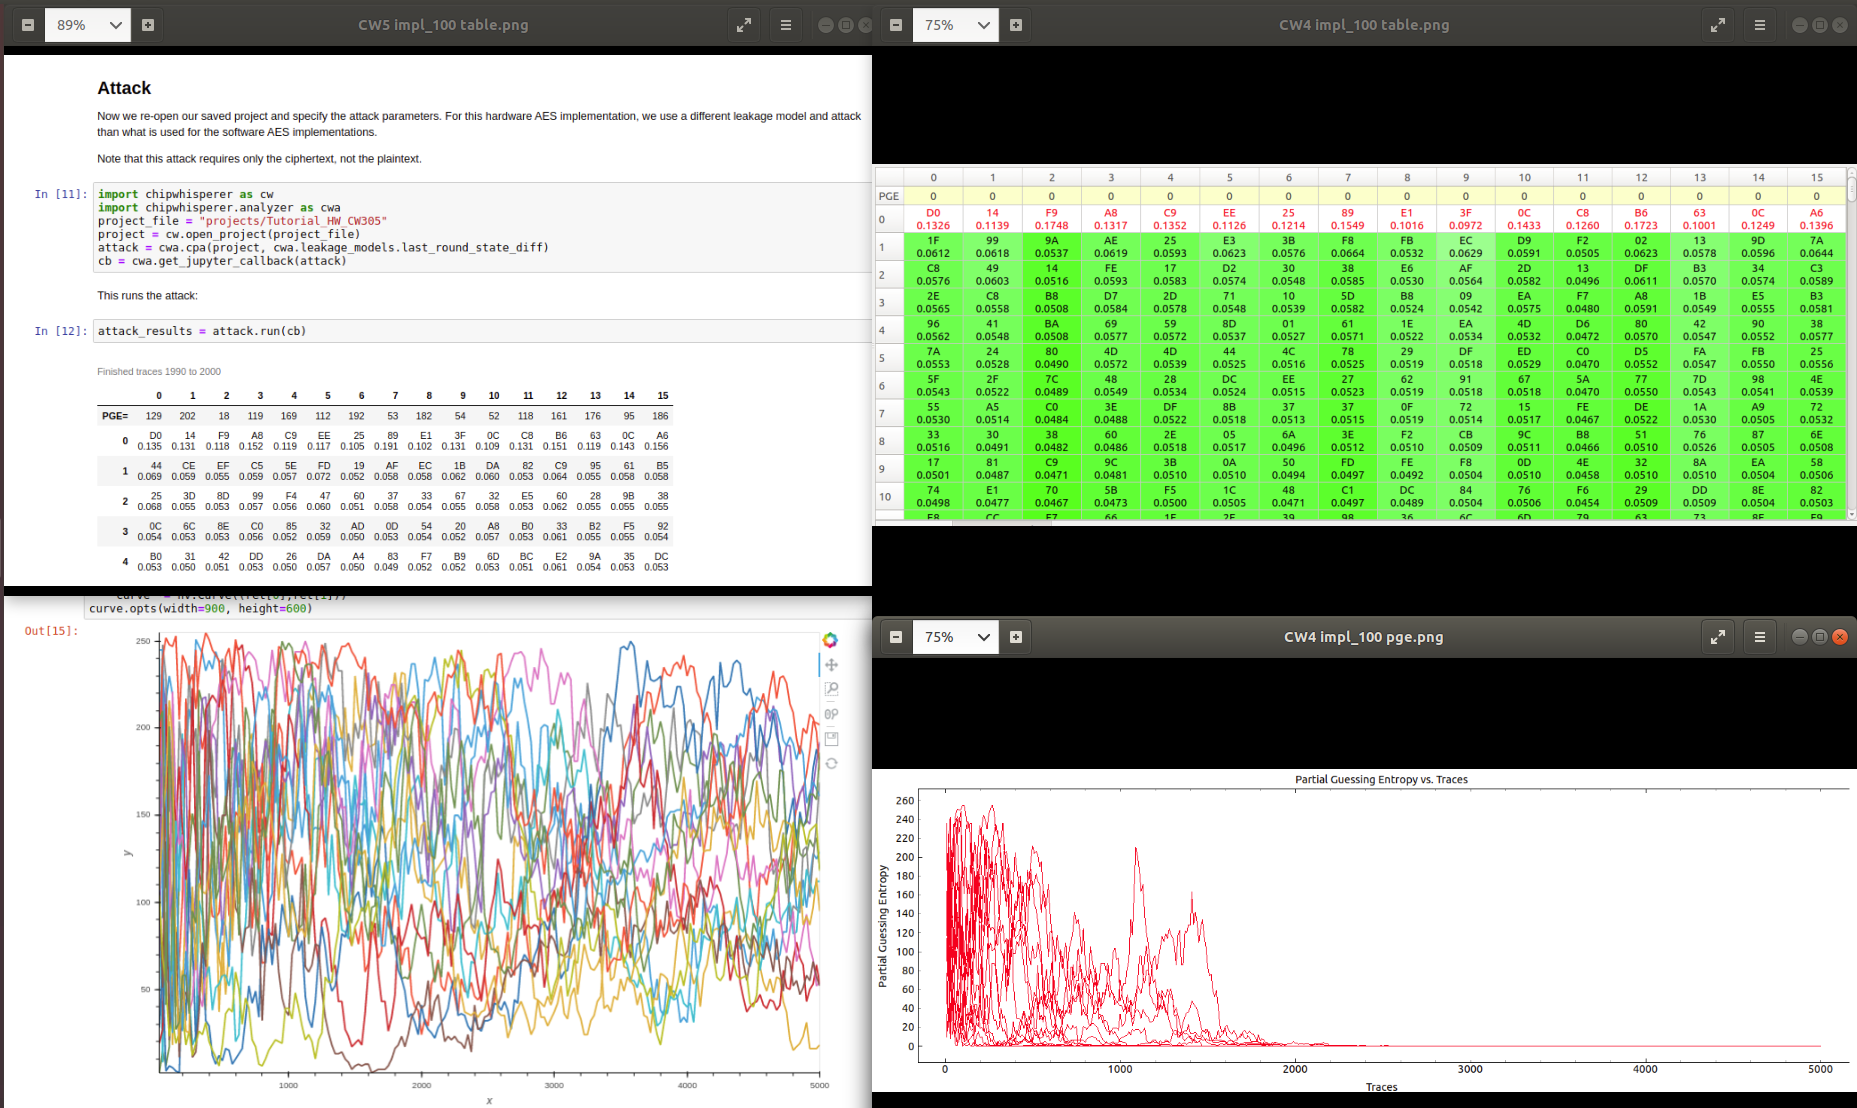
# ## Attack
# Now we re-open our saved project and specify the attack parameters. For this hardware AES implementation, we use a different leakage model and attack than what is used for the software AES implementations.
#
# Note that this attack requires only the ciphertext, not the plaintext.
# In[11]:
import chipwhisperer as cw
import chipwhisperer.analyzer as cwa
project_file = "projects/Tutorial_HW_CW305"
project = cw.open_project(project_file)
attack = cwa.cpa(project, cwa.leakage_models.last_round_state_diff)
cb = cwa.get_jupyter_callback(attack)
# This runs the attack:
# In[12]:
attack_results = attack.run(cb)
# In[ ]:
# In[13]:
plot_data = cwa.analyzer_plots(attack_results)
# In[14]:
import holoviews as hv
from holoviews.operation.datashader import datashade, shade, dynspread, rasterize
from holoviews.operation import decimate
import pandas as pd, numpy as np
a = []
b = []
hv.extension('bokeh')
for i in range(0, 16):
data = plot_data.output_vs_time(i)
a.append(np.array(data[1]))
b.append(np.array(data[2]))
b.append(np.array(data[3]))
pda = pd.DataFrame(a).transpose().rename(str, axis='columns')
pdb = pd.DataFrame(b).transpose().rename(str, axis='columns')
curve = hv.Curve(pdb['0']).options(color='green')
for i in range(1, 16):
curve *= hv.Curve(pdb[str(i)]).options(color='green')
for i in range(0, 16):
curve *= hv.Curve(pda[str(i)]).options(color='red')
decimate(curve.opts(width=900, height=600))
# In[15]:
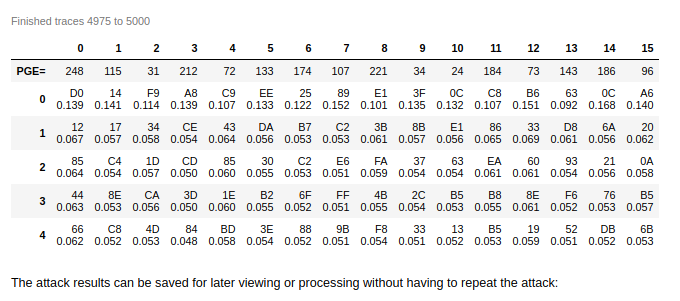
ret = plot_data.pge_vs_trace(0)
curve = hv.Curve((ret[0],ret[1]))
for bnum in range(1, 16):
ret = plot_data.pge_vs_trace(bnum)
curve *= hv.Curve((ret[0],ret[1]))
curve.opts(width=900, height=600)
# In[ ]:
# The attack results can be saved for later viewing or processing without having to repeat the attack:
# In[16]:
import pickle
pickle_file = project_file + ".results.pickle"
pickle.dump(attack_results, open(pickle_file, "wb"))
# You may notice that we didn't get the expected key from this attack, but still got a good difference in correlation between the best guess and the next best guess. This is because we actually recovered the key from the last round of AES. We'll need to use analyzer to get the actual AES key:
# In[17]:
from chipwhisperer.analyzer.attacks.models.aes.key_schedule import key_schedule_rounds
recv_lastroundkey = [kguess[0][0] for kguess in attack_results.find_maximums()]
recv_key = key_schedule_rounds(recv_lastroundkey, 10, 0)
for subkey in recv_key:
print(hex(subkey))
# ## Tests
# Check that the key obtained by the attack is the key that was used.
# This attack targets the last round key, so we have to roll it back to compare against the key we provided.
# In[18]:
key = list(key)
assert (key == recv_key), "Failed to recover encryption key\nGot: {}\nExpected: {}".format(recv_key, key)
# In[ ]: