Hi everyone!
I have an attack I developed previously that I am trying to port to Husky. It is a voltage glitch attack that has an external trigger coming over TIO4 - same for both Lite and Husky. It works flawlessly on CW-Lite but I cannot get almost any successful glitches on a Husky despite the same settings (or at least I believe they are).
This is the glitch setting snippet:
if scope._is_husky:
    print('Husky detected')
    scope.clock.adc_mul = 1
else:
    print('Non-husky detected')
    scope.clock.adc_src = "clkgen_x1"
    scope.glitch.clk_src = "clkgen"

scope.clock.clkgen_freq = 150e6

if scope._is_husky:
    scope.glitch.enabled = True
    scope.glitch.clk_src = "pll"

scope.glitch.output = "enable_only"
scope.glitch.trigger_src = "ext_single"
scope.io.glitch_hp = True
scope.io.glitch_lp = True

# this is what I use to monitor the glitch shape on HS2
scope.io.hs2 = 'glitch'

if scope._is_husky:
    scope.io.aux_io_mcx = 'hs2' # On CW-Lite I just use HS2 PIN on CW308
This being a enable_only voltage glitching attack, I use scope.glitch.ext_offset and scope.glitch.repeat to set the glitch parameters.
Differences between CW-Lite and CW-Husky
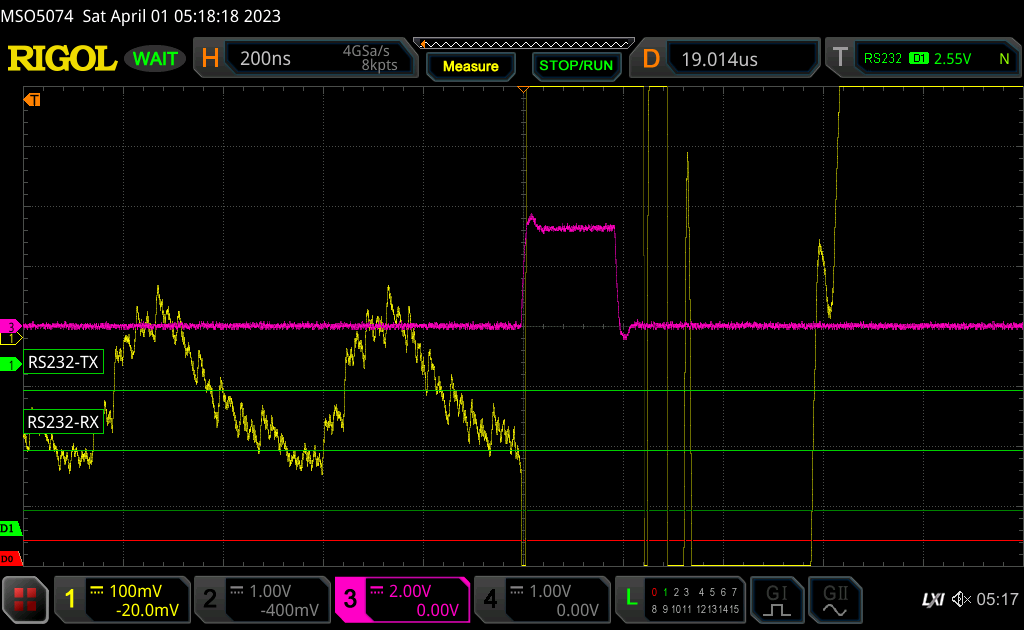
As you can see below on the images, the glitch pulse length/shape is almost the same, so I think all the clocks are set the same and the behavior is consistent (trying to rule out a simpler mistake in settings).
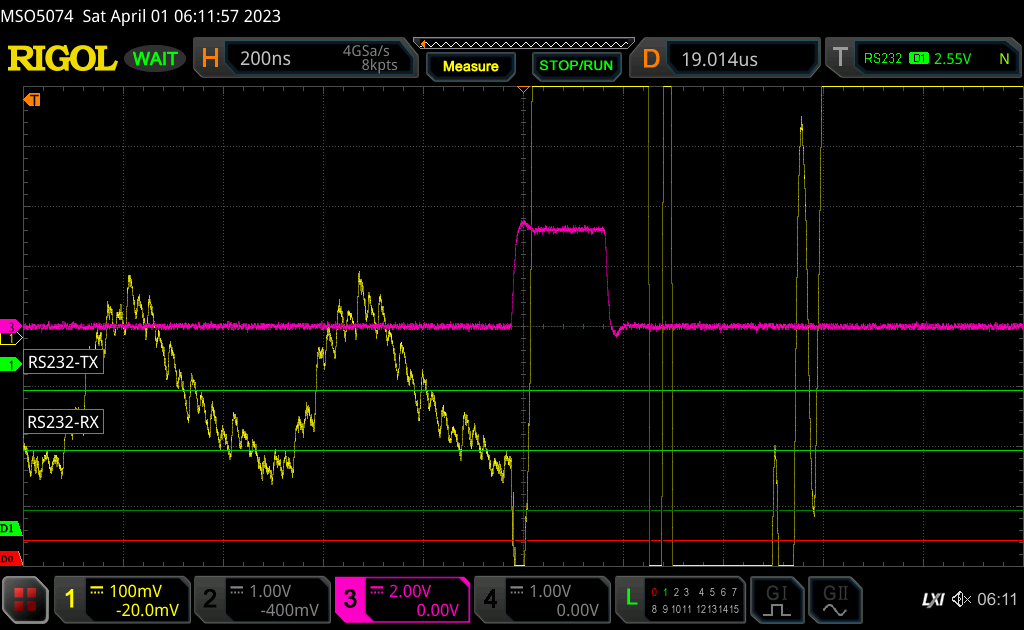
Both glitch_hp and glitch_lp are enabled, on both the CW-Lite and Husky. But the power trace effect looks quite different (to me). I know the LP mosfet changed to a different part on Husky - not sure if that could be part of the problem?
I tried this on a Husky with only the HP mosfet enabled (last image) and the effect on the power trace is closer to the CW-Lite, the success is rate is a little better than nothing, but still not on-par with CW-Lite (for this specific attack).
Are there any other differences I might have missed between CW-Lite and CW-Husky that could be causing the difference in the behavior?
I remember reading about a small difference between mosfets (date codes) in a Crowd Supply update (the REVB one), this Husky is HWREV: 1.0 if that makes a difference.
Are there some settings that can be tweaked further or is this just a property of the mosfet?
Would it make sense to try to compare glitch shapes, i.e. like the waveforms in the CW test report to see how similar are they between CW-Lite and Husky?
Do you think it can make this much of a difference (glitching works every time vs. rarely)?
Any other suggestions are welcome!
Oscilloscope data
Here are screenshots from my oscilloscope, in yellow you can see output of the CW501 Differential Probe, in magenta you can see HS2 output (glitch).
Note: It is a sweeping attack (in time) so timing (ext_offset) might differ some. As it sweeps the same area over and over and I can get many glitches on CW-Lite and literally zero on Husky with the same sweeping of the ext_offset, I do not believe this is the cause of the problem.
Glitch shape on CW-Lite with HP and LP enabled
Glitch shape on CW Husky with HP and LP enabled
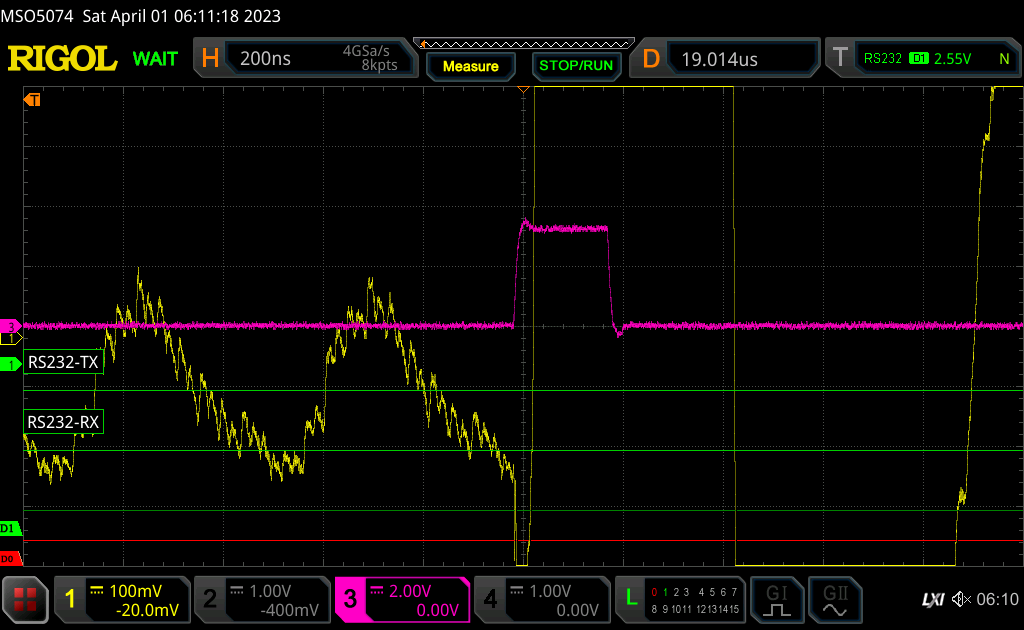
Glitch shape on CW Husky with only HP enabled