Hi,
I currently use the CW-Lite board to attack a third party board.
I just have 2 questions about triggering a glitch (power or clock).
My first question is : If I decided to trigger manually a glitch, on which reference of time does the glitch will be triggered ? (frequency of the CW-Lite ? or frequency of my computer, where I execute python instruction ?)
My second question is about clock glitch : Is it possible to trigger manually glitch by attacking the clock signal of the target ? (Obviously, in the embedded software, I open the External Port Clock usage)
Thanks by advance !
1- The glitch-generating circuitry operates on the clock specified by scope.glitch.clk_src, regardless of how you trigger the glitch.
2- I’m not sure I fully understand, but yes, you can tie the glitch to the target clock by setting scope.glitch.clk_src appropriately for your use-case.
Jean-Pierre
Hi jpthibault,
Thanks to your last return !
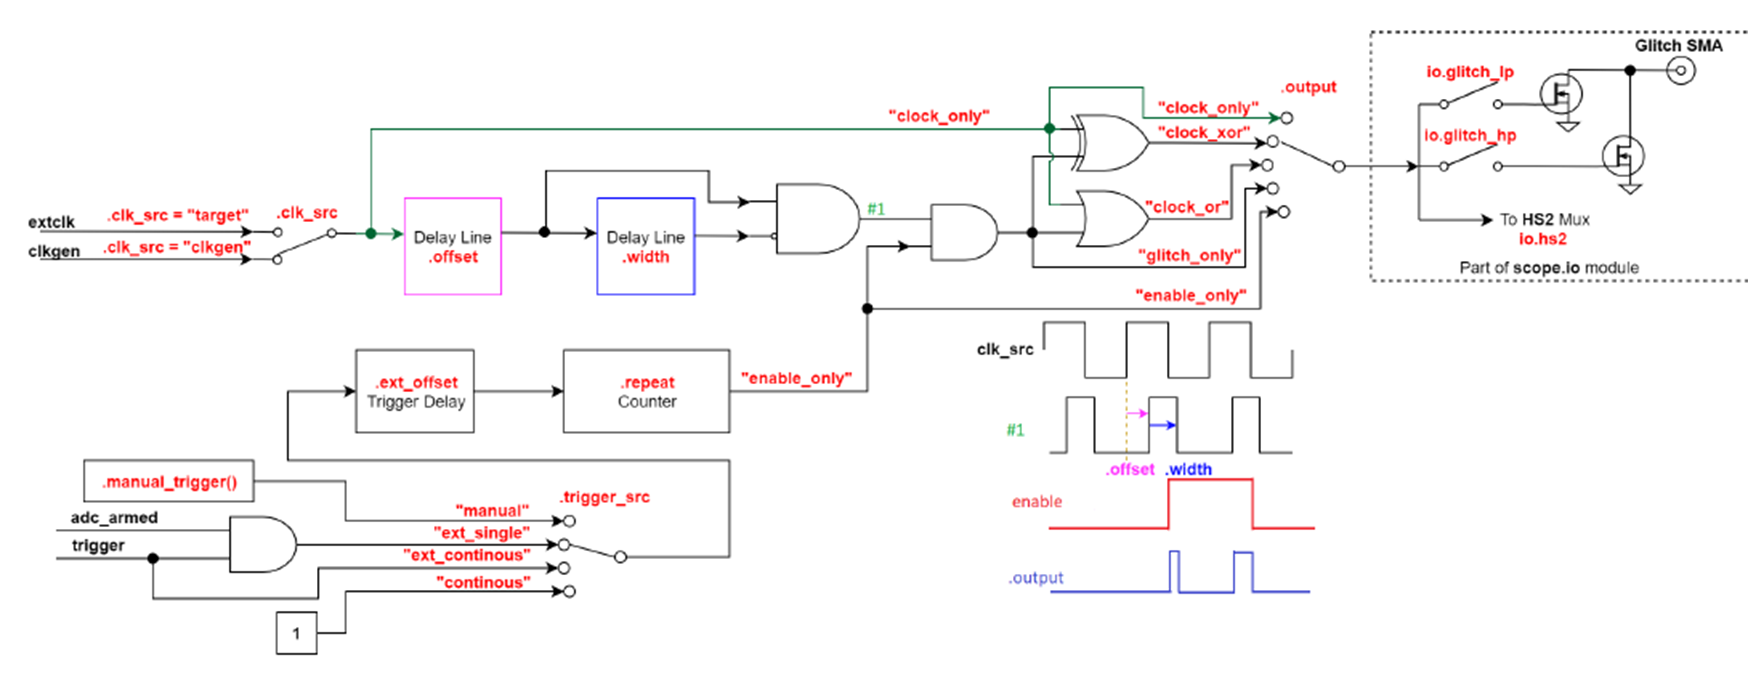
I still have a doubt on the CW wires configuration from the diagram below
What are the difference between “enable only” and “glitch_only” configurations ?
If a well understood, I believe “glitch_only” allow the user to play on the injection delay (using .width and .offset additional parameters) from the clock signal of the CW-Lite whereas “enable only” allow the user to play just with “.repeat” and “ext_offset”.
Thanks to your return !
That’s right. In the waveform diagram above, the blue “output” waveform is the “glitch_only” case, and the red “enable” is “enable_only”.
Jean-Pierre
Hi jpthibault,
I was trying to glitch in manual mode (without external triggering pin) but I don’t manage to use the module.
Can you please detail each configuration instruction to define before triggering manually the glitch power module ?
I precise that in my configuration, the SMA cable is linked correctly but no one HS1 or HS2 clock is connected with the CW-Lite board.
What I tried:
scope.clock.clkgen_freq = 64E6
target.baud = 115200

def reboot_flush():
    scope.io.nrst = False
    time.sleep(0.05)
    scope.io.nrst = "high_z"
    time.sleep(0.05)
    target.flush()

reboot_flush()

scope.glitch.clk_src = "clkgen"

scope.glitch.output = "glitch_only"
scope.glitch.trigger_src = "manual"
scope.glitch.manual_trigger()

import matplotlib.pylab as plt
import chipwhisperer.common.results.glitch as glitch
gc = glitch.GlitchController(parameters=["width", "offset"], groups=["success"])
gc.display_stats()
g_step = 0.2 # pas de boucle
gc.set_range("width", 48, 48.6)
gc.set_range("offset", -19, -21.5)
scope.glitch.repeat = 8
gc.set_global_step(g_step)
scope.io.glitch_hp = True
scope.io.glitch_lp = True

for glitch_setting in gc.glitch_values():
    scope.glitch.width = glitch_setting[0]
    scope.glitch.offset = glitch_setting[1]

    for i in range(1000):
        scope.io.glitch_hp = False
        scope.io.glitch_hp = True
        scope.io.glitch_lp = False
        scope.io.glitch_lp = True
I hope it help
Your for i in range(1000) loop is doing nothing beyond changing which MOSFET is enabled when a glitch is triggered. It does not actually generate any glitches.
From the documentation:
GPIOSettings.glitch_hp scope.io.glitch_hp
Whether the high-power crowbar MOSFET is enabled.
The glitch output is an SMA-connected output line that is normally connected to a target’s power rails. If this setting is enabled, a high-powered MOSFET shorts the power-rail to ground when the glitch module’s output is active.
scope.glitch.manual_trigger() is what triggers a glitch event. This is what you want to call in your for loop.
Thanks to your return @jpthibault it helped me !
Few more questions about the glitch power module.
In all the Jupyter example (“glitch loop” for instance), we can find this instruction sequence:
scope.io.glitch_hp = False
scope.io.glitch_hp = True
scope.io.glitch_lp = False
scope.io.glitch_lp = True
My first question : Why we disable, then enable each MOSFET after arming the scope in all the example providing by NewAE ? Is it mandatory in my case ? (It tested it in my code after calling “scope.glitch.manual_trigger()”)
My second question : When I ran the example provided by NewAE, I made “power” and “clock” glitch. I could see the blue led blinking faster when I increased the “repeat” parameter. But when I use the manual glitching mode the blue LED is blinking constantly and at the same speed that when there is no glitch. Is it normal ?
My third question : Is it mandatory to declare those instructions “scope.clock.clkgen_freq = 64E6” and “scope.glitch.clk_src = “clkgen”” for using manual triggering glitch mode ?
Thanks by advance to your return
The Fault 2_1 notebook has the reason:
        # should reset glitch module to make sure nothing stuck high
        scope.io.glitch_hp = False
        scope.io.glitch_hp = True
        scope.io.glitch_lp = False
        scope.io.glitch_lp = True
Which example? We have many 
The meaning of the LEDs is explained here: CW1173 ChipWhisperer-Lite - NewAE Hardware Product Documentation
Of course not, any valid clock frequency will do.
Of course not, any valid clock frequency will do.
Yes but to perform my tests. My external target is clocked on his HSI (High Speed Internal Clock at 64 Mhz). Therefore, I don’t use HS2/O port of the CW-Lite.
If I decide to use the HS1/I, by sending the HSI to the CW-Lite, what are required instructions I will have to use ? Even with documentation, I don’t manage to see the expected instructions to use the API.
Then, if I not decide to use the HS1/I and so I don’t synchronize the CW-Lite on HSI PLL of my target, how can I do ? Does the CW-Lite can still perform glitch ? if yes, on which reference ? (Can we use scope.clock.clkgen_freq = 64E6 and scope.glitch.clk_src = “clkgen” in that case ?)
CW gives you a lot of flexibility for clocking and I think this is what’s causing you some confusion.
First, you need to understand that you can set the source for the ADC sampling clock independently of the source for the glitch generation module.
So let’s first set up your ADC sampling clock. If I understand correctly, your target generates its own clock, and this is provided to your CW-lite on HS1. So what you want is:
scope.clock.adc_src = "extclk_x4" (or extclk_x1)
Next, glitching. Here I think the documentation is pretty clear; you want:
scope.glitch.clk_src = "target"
This way, both sampling and glitching are synchronous to your target’s clock.
You do not need to think about scope.clock.clkgen_freq, because this sets the clock frequency of CW-lite’s internally-generated clock, which is meant for cases where CW-lite is providing the target’s clock.
I hope this clarifies ChipWhisperer clocking for you.
Jean-Pierre
So let’s first set up your ADC sampling clock. If I understand correctly, your target generates its own clock, and this is provided to your CW-lite on HS1. So what you want is:
scope.clock.adc_src = "extclk_x4" (or extclk_x1)
Ok, I well configured this part. Below, the return of my Jupyter Notebook Environment:
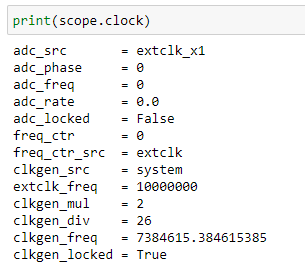
Normally, the CW-Lite board should have the ADC locked on the read-only frequency after many secondes but in my case still nothing as you can see from the print result.
Then, I didn’t find again my 64 Mhz clock output frequency from my target board.
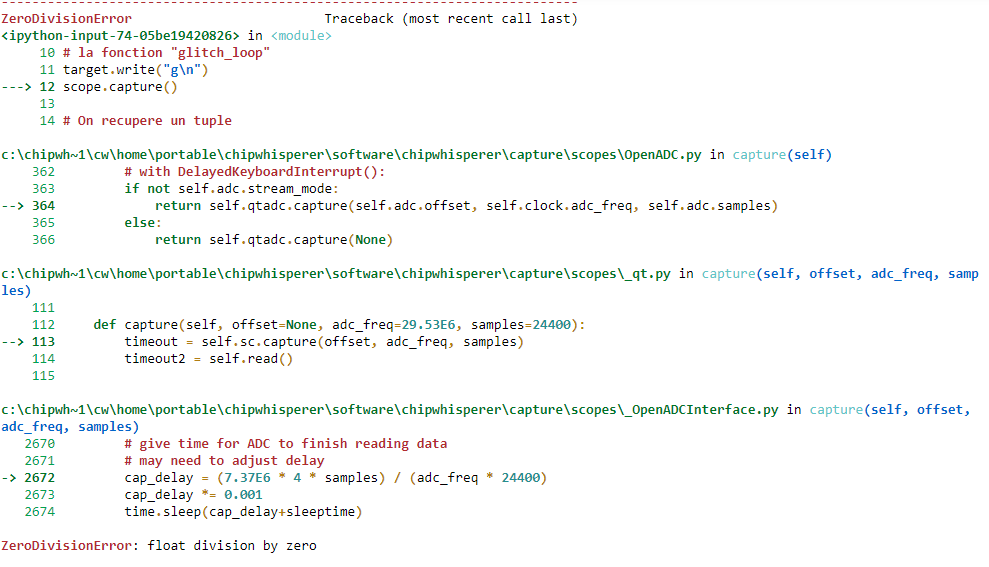
I even execute a part of code from Jupyter Notebook (see below) to check the return of the scope capture but as the adc is not locked, it raises an error for capturing:
reboot_flush()
scope.arm()

target.write("g\n")
scope.capture()

val = target.simpleserial_read_witherrors('r', 4, glitch_timeout=10)#For loop check
valid = val['valid']
if valid:
    response = val['payload']
    raw_serial = val['full_response']
    error_code = val['rv']

print(val)
Here is the error result:
Hope it could help you.
Thanks again to your last returns !
Try scope.clock.reset_adc(). If that doesn’t help, check the obvious: is the 64 MHz clock actually there on HS1? Is the connection good? (cheap jumper cables may not work very well for this). Have you connected ground between your target and CW-lite?
It seems to work after many > scope.clock.reset_adc().
Thanks to your help @jpthibault