Hi everyone,
I met an issue regarding the voltage glitching while many experiences on various targets.
In fact, with CW-Lite to perform attack and CW308 baseboard to plug my targets, I used a T-connector to insert glitch, then to get the waveform on an external oscilloscope.
I well see the glitch waveform on my oscilloscope but the normal target functioning (before the glitch) isn’t 3.3V as expected on many targets such as : XMEGA, STM32L5 and STM32F1. I tested it !
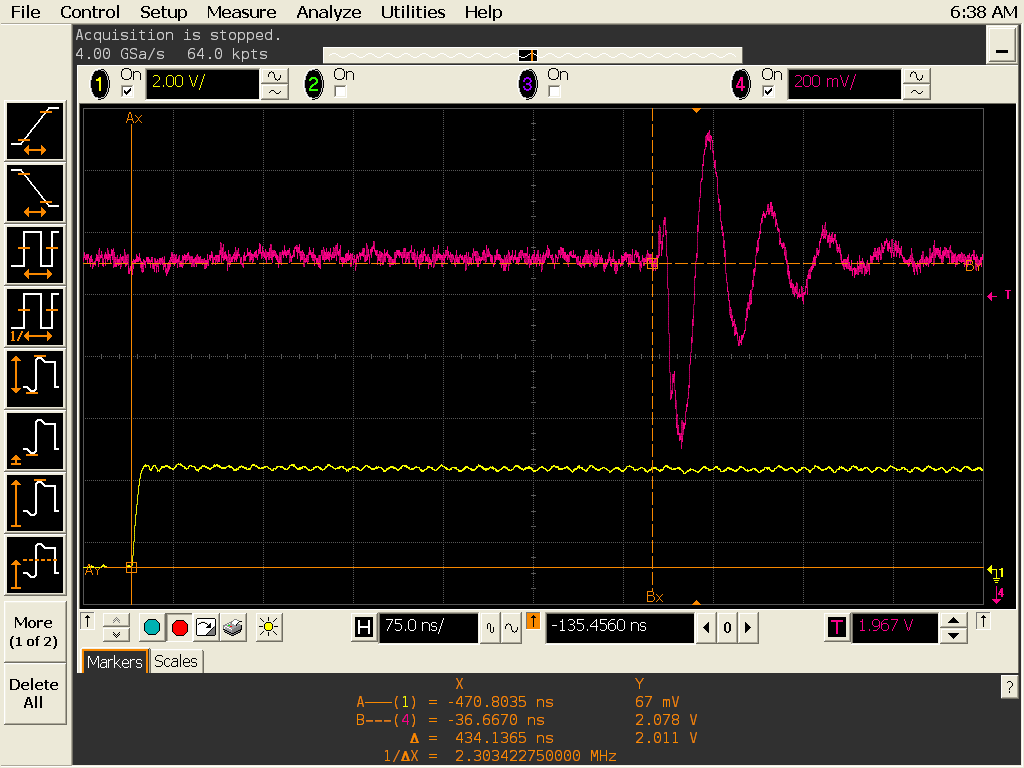
Below, you can watch the waveform of the glitch generated on XMEGA target and the 3,3V isn’t here just as the low voltage glitch (almost 0V) thanks to CW-Lite test report.
Another screenshot but this time with a STM32L5 board (there is 2 adjacent glitch) …
About my hardware configuration:
-I used the 20-pin connector to supply C308 baseboard and so the power rail
-I put J4 on default position meaning that “VREF Network set by VREF Pin from Victim Board”
- I put J14 on default position meaning that “Filter input set by FILT Pin from Victim Board”
-I used the 24Mhz clock provided by the CW-Lite, and so J3 is in the 3rd position
- I used a multimeter to measure the voltage of before and after the “shunt resistor”(R3) and I get 3,27V.
In all those case, could you please explain me why I don’t manage to see 3,3V on my oscilloscope screen ? Then, why the glitch waveform don’t tend to almost 0V as in the CW-Lite test report ?
Another special thing I remark, when I connect my oscilloscope to my T-type sma connector, I can’t even attack my embedded code even though I have the right configurations… do you have an explanation about that issue ?
Thank you by advance !
Théophile
Hi Theophile,
You’ve measured 3.3V on the power rail using a multimeter, correct? I suspect there’s something wrong with your scope, as you’re measuring the same thing on your scope and with your multimeter and getting different results.
Alex
I would like to ask you if it’s possible (thanks to a single embedded software) to put many tags to trigger and stop the attack inside a single code ? Does it work ?
Or can you show me another way to perform it ?
Hi Theophile,
I’m not quite sure what you mean by tags? Do you mean many different instances of trigger_high() and trigger_low()? If so, you can swap scope.glitch.trigger_source to 'ext_continuous', which removes the requirement to arm the scope before triggering a glitch.
Alex
For ARM targets, you may want to have a look at our trace-based triggering capabilities:
The learning curve can be steep if you’re not familiar with ARM trace, but it could be just what you need. You’ll need additional capture hardware to use this https://rtfm.newae.com/Tools/PhyWhisperer.html; start by reading our documentation in the DesignStartTrace repository to see if it makes sense for your use case.
Jean-Pierre
Hi Alex,
" Do you mean many different instances of trigger_high() and trigger_low() ?"
Yes, it’s exactly what I need.
In fact, if I take the decision to use “ext_continuous” mode, does it mean the glitch will be trigger on “trigger_high()” (because a pin has been setted on high state) and stop on “trigger_low()” (because the same pin has been setted on low state) ?
On the same way, with “ext_continuous” mode, is it still possible to use the “ext_offset” or the glitch will be repeated on each clock rising edge between “trigger_high()” and “trigger_low()” ?
Thanks to your return !
Hi Jean-Pierre,
Thanks to your explanations about the PhyWhisperer but at this time, we are not interested about the capabilities of this product.
Hi Theophile,
The trigger only has an effect on when a glitch starts - it does not matter whether your trigger is only high for 30 clock cycles or 30000 clock cycles, the glitch is exactly the same. All ext_continuous does is remove the requirement to arm the scope before the glitch will fire - the exact same glitch will fire after every trigger_high() call as would fire after the first trigger_high() call in ext_single.
Alex
Hi Alex,
Thanks to your last return, I believe I well understood the possibilities of using the module.
So, if I want to attack several parts of an embedded code, the most suitable mode is “ext_continuous”.
For example, I have the following code :
int main()
{
trigger_high()
my_first_critical_function_to_check()
trigger_low()
trigger_high()
my_second_critical_function_to_check()
trigger_low()
}
Can you confirm it will work with the “ext_continuous” mode ?
Théophile
I missed to ask you another thing about the way of using the parameters in “ext_continuous” mode.
Is it still possible to use “ext_offset” parameter in “ext_continuous” mode ?
If so, I was wondering how it works ?
In fact, if I attack two different pieces of code (as the example in my last message), and I use an “ext_offset” of 9, then there will be an offset of 9 clock cycles before the glitch is injected. However, I was wondering what was the reference (or clock cycle number 0) before the injection?
Is it a counter that restarts at 0 when the “trigger_high” function is called?
Théophile
Yeah, I believe it’s just a counter that gets reset, though I’m not sure what resets it. The glitch module code is available at: https://github.com/newaetech/chipwhisperer/tree/master/hardware/common/hdl/clockglitch if you want to take a look.
Alex
Yep, the offset counter starts from 0 when the trigger is asserted, and gets reset when the trigger is de-asserted.
So if you set ext_offset=9 with ext_continuous, then a glitch will be generated 9 cycles after every trigger assertion.
Jean-Pierre